Honeycomb Blinds are one of those home upgrades you don’t realise you love until you have them. They offer soft light filtering, energy efficiency, and a clean, modern look all in one. But what happens when they get damaged? A complicated tug or simple wear and tear can leave your beautiful Honeycomb Blinds looking less than perfect. The good news is that not all damage means replacement. Many common issues can be repaired at home with the right approach and a little patience.
In this guide, we’ll walk you through everything you need to know about repairing Honeycomb Blinds, from identifying damage and gathering tools to knowing when it’s time to call a professional.
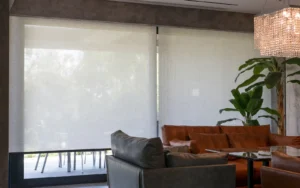
What Are Honeycomb Blinds?
Honeycomb Blinds are designed for people who want more from their window coverings than just good looks. While they certainly add a clean and elegant touch to any space, their real strength lies in how intelligently they are constructed. The fabric forms soft, layered cells that create pockets of air, which act as a natural barrier between your room and the outside environment. This helps regulate indoor temperature, making your home feel more comfortable throughout the year while also supporting energy savings.
Unlike traditional blinds that rely on flat slats or heavy curtains, Honeycomb Blinds offer a lightweight, fabric-based structure that folds neatly when raised and settles smoothly when lowered. This creates a streamlined appearance that feels modern and uncluttered. Whether your goal is to gently filter sunlight, reduce glare, or completely block out light for restful sleep, Honeycomb Blinds give you flexible control over your environment.
Common Types of Damage in Honeycomb Blinds
Below are the most common types of damage found in Honeycomb Blinds.
Cord-related issues
One of the most frequent problems with Honeycomb Blinds involves the internal lift cords. These cords help raise and lower the blinds smoothly, but over time, they can fray, stretch, or even snap.
Crushed or misshapen cells
The soft cellular structure of Honeycomb Blinds can sometimes lose its shape due to pressure, improper handling, or storage. When this happens, the cells may look flattened, wrinkled, or uneven, affecting both the appearance and insulation performance.
Tears and fabric damage
Pets, children, sharp objects, or accidental pulls can cause small tears or holes in the fabric. While minor at first, these can grow larger if not repaired promptly.
Uneven or tilted bottom rail
If your Honeycomb Blinds appear slanted when fully lowered, it is often due to uneven cord tension. This makes one side hang lower than the other, giving the blinds a crooked appearance and reducing smooth operation.
Dust buildup and discolouration
While not a structural issue, accumulated dust, moisture exposure, or prolonged sunlight can lead to discolouration or dulling of the fabric. This affects the overall look and freshness of your Honeycomb Blinds.
Safety Tips Before Repairing
While most repairs are simple and manageable, these blinds are made with delicate fabric and precisely engineered internal components. Here are the key safety tips to keep in mind.
Lower the blinds completely
Always start by fully lowering your Honeycomb Blinds. This reduces tension in the cords and makes the structure more stable while you work.
Remove the blinds from the window if needed
For cord repairs or internal adjustments, it is safer to detach the blinds from their mounting brackets and place them on a flat surface.
Disconnect power for motorised blinds
If you are working on motorised Honeycomb Blinds, make sure to switch off the power supply or remove the batteries before starting. This prevents accidental movement while your hands are inside the mechanism.
Keep tools organised and within reach
Before you begin, arrange your tools neatly on your work surface. Searching for tools midway through a repair can lead to rushed movements and accidental tears.
Work in a well-lit area
Good lighting helps you clearly see cords, rails, and fabric details. This reduces mistakes and makes the repair process more precise.
Wear protective gloves if necessary
If you are handling sharp tools, metal components, or trimming cords, lightweight gloves can protect your hands from cuts or scratches.

Tools & Materials Needed
The structure of these blinds is delicate yet thoughtfully engineered, so using the right tools ensures you fix the issue without creating a new one. Here is what you will typically need.
Essential Tools
Flathead or Phillips screwdriver: Useful for removing brackets, opening rail ends, or accessing the internal cord system.
Sharp scissors: Needed for trimming replacement cords or cutting frayed threads cleanly.
Measuring tape: Important for ensuring cords are replaced at the correct length, and both sides remain balanced.
Needle-nose pliers: Helpful when threading cords through narrow channels or gripping small components securely.
Clean flat surface: A table or large counter allows you to lay your Honeycomb Blinds down safely without bending or crushing the cells.
Repair Supplies
Replacement lift cord: If your Honeycomb Blinds are not lifting evenly or the cord has snapped, you will need a compatible cord of similar thickness and strength.
Fabric adhesive: A clear drying adhesive designed for fabric works best for minor tears or loose edges.
Matching thread and needle: For tiny rips, careful stitching can reinforce the area without affecting appearance.
Soft cleaning cloth: Dust or dirt around the damaged area should be removed before applying adhesive or handling fabric.
Step-by-Step Repair Instructions
Fixing Cord Issues
Start by fully lowering the blind to release tension. Remove it from the mounting brackets and place it on a flat surface. Carefully open the bottom rail by removing the end caps using a screwdriver. This will give you access to the internal cords.
Fixing Sagging or Uneven Blinds
Gently pull the cord to adjust the height until both sides align evenly. Tie a secure knot once the balance looks correct and replace the end cap. Reinstall and test the blind several times to ensure it moves evenly
Replacing Damaged Cells
For slight creases, extend the blind fully and use gentle steam to relax the fabric. Lightly reshape the cells with your hands and allow them to dry completely before retracting.
Repairing Track & Rail Issues
Begin by inspecting the mounting brackets to ensure they are secure and properly aligned. Loose brackets can cause uneven movement. Tighten any loose screws and ensure the blind is seated correctly.
Repairing Fabric Tears
Apply a small amount of clear fabric adhesive along the tear and press the edges together gently. Hold in place for a few moments to ensure proper bonding. Place a thin fabric patch behind the damaged section before applying adhesive.
When to Call a Professional
If the blinds stop functioning completely, make unusual noises from inside the headrail, or remain stuck even after cord adjustments, the internal mechanism may require professional attention. Motorised Honeycomb Blinds should also be inspected by a specialist if resetting or changing batteries does not resolve the issue. Electrical components and motors need precise handling to avoid long-term damage.
Severe fabric damage, multiple crushed cells, or large tears often require panel replacement to maintain the blind’s appearance and insulation performance. Custom-sized Honeycomb Blinds and products under warranty should also be repaired by authorised professionals to protect fit, function, and coverage.
When the repair feels complex or uncertain, choosing professional service ensures your Honeycomb Blinds are restored safely and correctly.

FAQ — Honeycomb Blinds Repair
Q1. Can I repair Honeycomb Blinds myself?
Yes, many minor issues like uneven cords, small tears, or slight sagging can be fixed at home with basic tools and a bit of patience.
Q2. How much does it cost to repair Honeycomb Blinds?
Repair costs depend on the damage. Small DIY fixes are inexpensive, while motor or major fabric repairs may cost more depending on the complexity.
Q3. What tools do I need for minor repairs?
Most minor repairs only require simple tools like a screwdriver, scissors, measuring tape, pliers, and possibly fabric adhesive or a replacement cord.
Q4. Can I replace just one cell?
In some cases, yes. Minor cell damage can be repaired or patched, but replacing a single cell perfectly can be tricky and may require professional assistance for a seamless finish.
Conclusion
Honeycomb Blinds are designed to make your space more comfortable, stylish, and energy-efficient. And while everyday use can sometimes lead to minor damage, most issues are easier to fix than they first appear. With the right tools, a little patience, and a clear understanding of the problem, you can restore smooth operation and keep your blinds looking as good as new.
If you are looking for blinds that combine smart engineering with refined design, Dooya offers thoughtfully crafted Honeycomb Blinds built for durability and effortless operation. Whether you need expert guidance, repair support, or are considering an upgrade, Dooya helps you maintain comfort and elegance in every window of your home.